Detect DLL Injection using Wazuh + Elastalert
MITRE Att&ck techniques Detections

1. Introduction
While working with WAZUH, I noticed it boasts over 3,000 rules as stated on their official website. With such extensive coverage, I decided to put these rules to the test. I chose the DLL Injection technique from the MITRE ATT&CK Framework and set up the necessary elements to launch the attack. However, WAZUH failed to detect anything related to the that, despite the abundance of predefined rules. Detecting such sophisticated attacks requires the creation of custom rules. In this blog, I will cover everything necessary to detect these types of attacks using WAZUH and forward the generated alerts to your incident and response management solution. So grab your coffee and your laptop, and let’s get started.
| Tool | Description |
|---|---|
| Sysmon | Monitors and reports key system activity via the Windows event log. |
| Ealstalert | Alerting on anomalies, spikes, or other patterns of interest from data in Elasticsearch. |
| Thehive | Security Incident Response Platform, serving as a vital tool for Security Operations Centers |
2. DLL Injection in a nutshell
What is DLL injection? In essence, DLL injection is a common techniques employed in malware and fileless adversary tradecraft to circumvent defenses. It entails the insertion of malicious code into running processes by coercing them to load external dynamic link libraries. These injected DLLs facilitate the execution of arbitrary code within the target process, granting attackers the ability to manipulate its behavior, extract sensitive data, or escalate privileges. I requested ChatGPT to outline the steps for implementing a custom DLL injection technique, and the provided details are quite accurate.
-
Identify the Target Process: Choose the process into which you want to inject the DLL. This could be any running process on the system.
-
Create or Obtain the DLL: Develop or acquire the DLL that contains the malicious code you want to inject into the target process. This DLL typically includes functions or payloads designed to carry out specific actions within the target process.
-
Choose Injection Technique: Select an appropriate DLL injection technique based on factors such as stealth, privilege level required, and compatibility with the target system.
-
Inject the DLL: Execute the chosen injection technique to insert the DLL into the target process. This typically involves invoking system functions or API calls to allocate memory, write the DLL path or binary into the target process’s memory space, and trigger the execution of the DLL code.
-
Execute Malicious Code: Once the DLL is successfully injected into the target process, the malicious code within the DLL gains execution privileges within the context of that process. This code can then carry out its intended actions, such as modifying process memory, intercepting system calls, or communicating with external servers.
-
Handle Errors and Clean Up: Implement error handling mechanisms to deal with potential failures during the injection process, such as insufficient permissions or invalid memory addresses. After executing the malicious code, clean up any resources or memory allocated during the injection process to avoid detection and maintain stealth.
I won’t detail or code the steps mentioned by ChatGPT, as this blog assumes that the reader already possesses a basic understanding of DLL injection. If not, there are numerous resources available on the internet that delve into DLL injection in depth. You can also find several proof-of-concept (POC) examples on GitHub. I recommend checking out the following blog post by crow, which covers almost everything about the technique from zero to hero.
3. DLL injection artifacts
To detect any technique using Wazuh basically we need to think of what this technique triggers when it get executed in the victim machine, Does it drop any files onto the disk? Which registry keys does it modify or create? What API calls are utilized to accomplish the task? etc… By considering these factors, you can identify various indicators to detect the technique’s execution and consolidate them into your own detection rule. For instance, in the case of DLL injection, analyzing the technique’s events may reveal specific API calls being used by the technique, such as :
Triggering these API calls doesn’t always signal a DLL injection attempt. Determining if it’s an attack requires careful consideration of several factors, like identifying the process initiating an OpenProcess call. Is the process already known? What permissions does it seek over the target process? Similarly, with a WriteProcessMemory call, it’s crucial to scrutinize the data being written into the target process. The most accurate detection method is monitoring CreateRemoteThread, as other API calls may require deeper investigation to distinguish false positives from true attacks when you receive an alert. Likely there is a tool called Sysmon which is a great tool that logs system activity to the Windows event log. It provides detailed information about process creation, network connections, file creation, registry changes, and more. Leveraging Sysmon, we can effectively detect DLL injection attempts and enhance our security posture.
4. Sysmon Configuration
To detect CreateRemoteThread API calls, you’ll need to install and configure Sysmon on your Windows machine. Let’s download the tool and set it up according to our requirements. Download the tool from Microsoft here, unzip the file anywhere on your machine. Download the configration file from here, and execute the following command (as administrator) to install the Sysmon driver:
> sysmon64.exe -accepteula -i .\sysmonconfig.xmlOnce Sysmon is installed and configured, let’s test it using SysmonSimulator. With SysmonSimulator, we can simulate various attacks using WINAPIs to generate the necessary logs for detection.
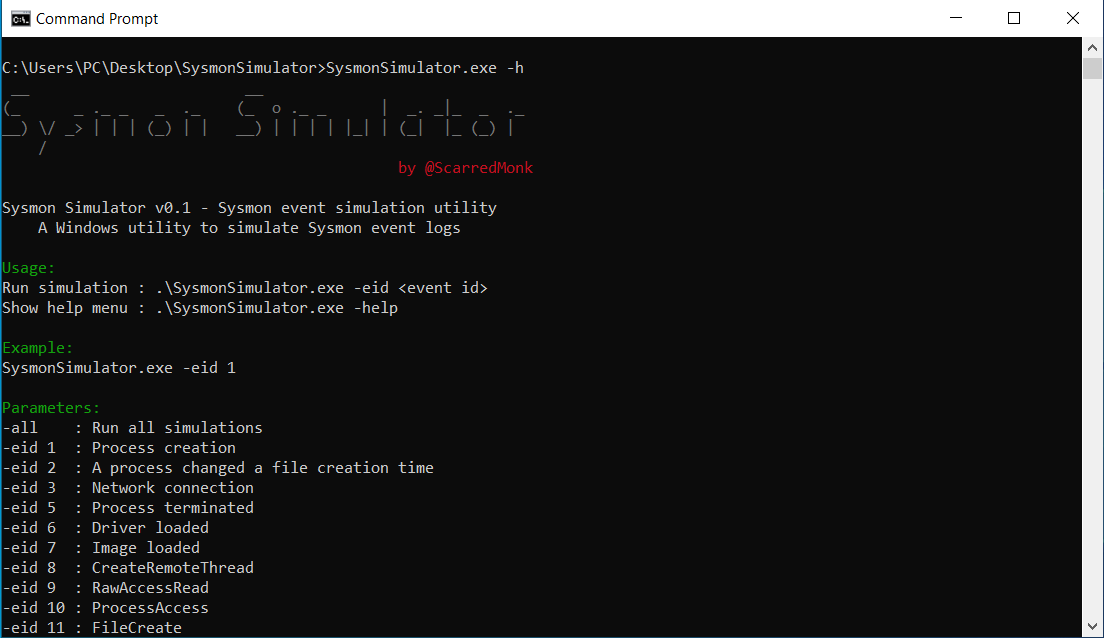
The CreateRemoteThread event id is 8, to simulate the API call we need to execute the following command :
> SysmonSimulator.exe -eid 8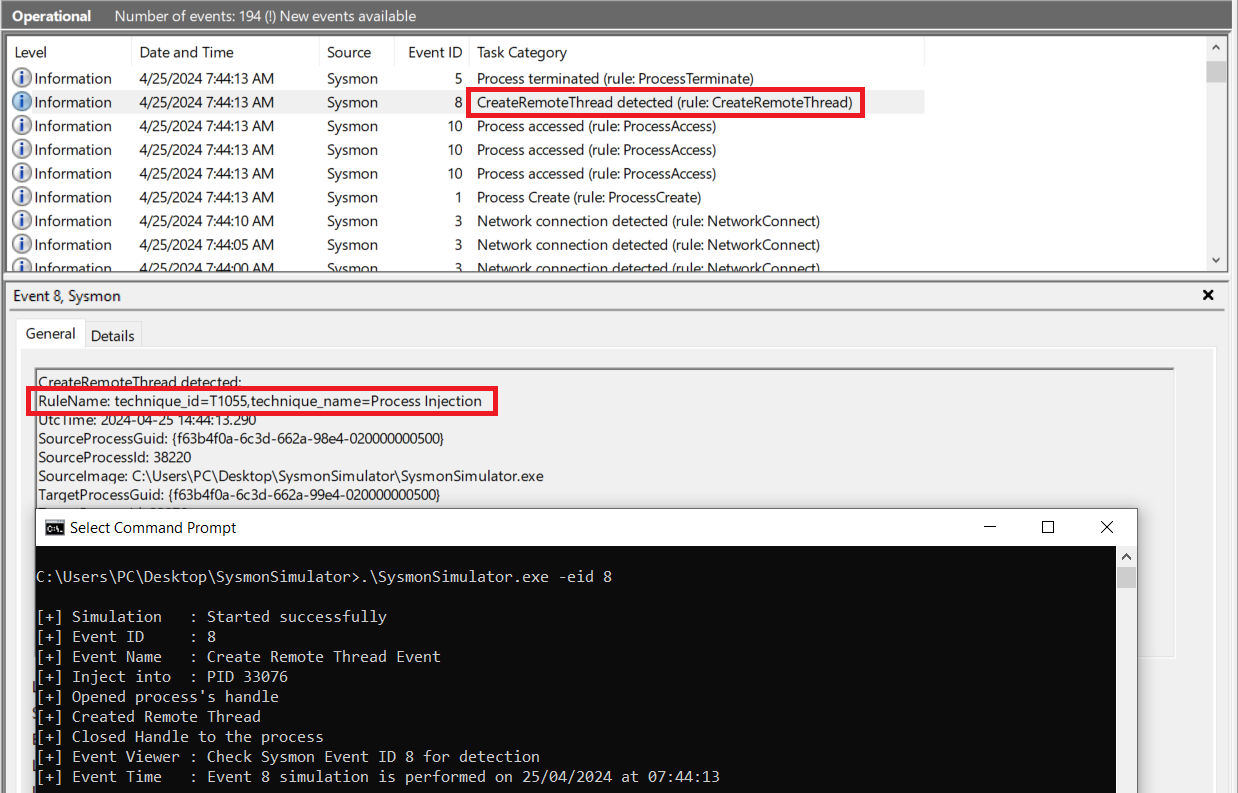
Great! As shown in the screenshot above, we’eve successfully generated the logs related to CreateRemoteThread, and as you can see that Sysmon labeled it as a Process Injection Technique.
5. Wazuh Configuration
Now that we have our sysmon up and ready we need to configure Wazuh to collect sysmon logs from event viewer and write our detection rule. We need to edit the file ossec.conf and add the following to tell Wazuh to collect sysmon logs :
<localfile>
    <location>Microsoft-Windows-Sysmon/Operational</location>
    <log_format>eventchannel</log_format>
</localfile>
To add your rules in Wazuh you can either add it to the file on your wazuh manger ossec/etc/rules/local_rules.xml, or add it trough your wazuh-indexer(kibana) like shown in the picture below:
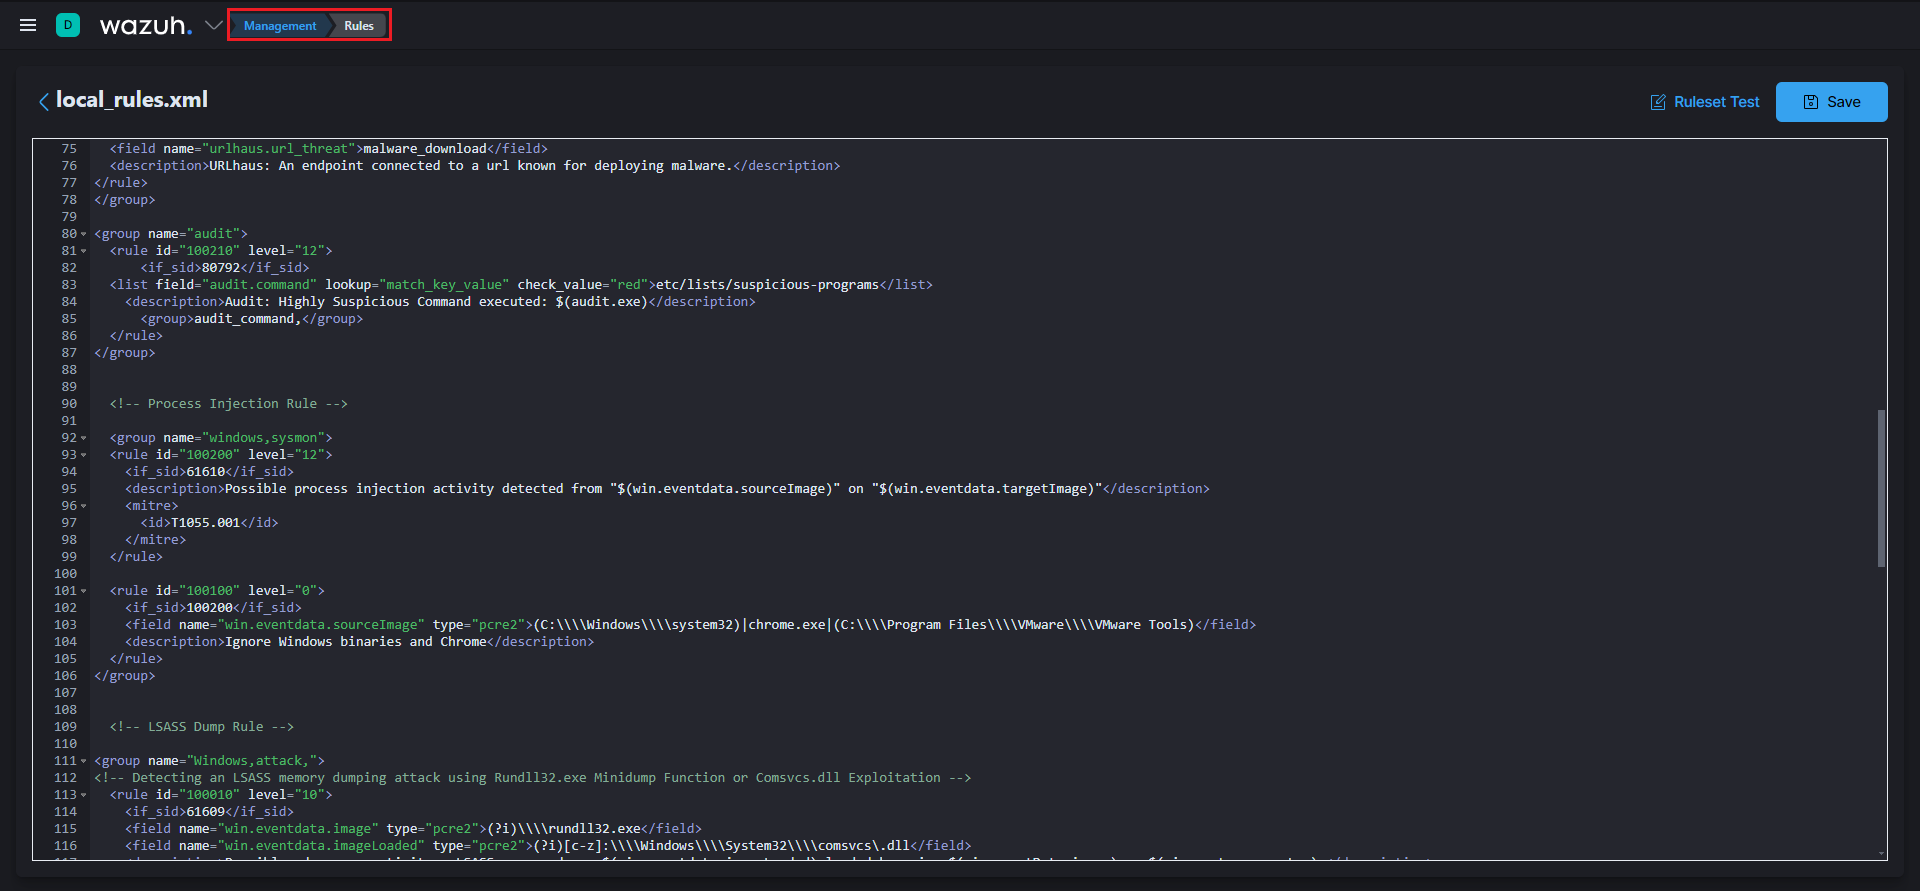
<group name="windows,sysmon">
<rule id="100200" level="12">
<if_sid>61610</if_sid>
<description>Possible process injection activity detected from "$(win.eventdata.sourceImage)" on "$(win.eventdata.targetImage)"</description>
<mitre>
<id>T1055.001</id>
</mitre>
</rule>
<rule id="100100" level="0">
<if_sid>100200</if_sid>
<field name="win.eventdata.sourceImage" type="pcre2">(C:\\\\Windows\\\\system32)|chrome.exe</field>
<description>Ignore Windows binaries and Chrome</description>
</rule>
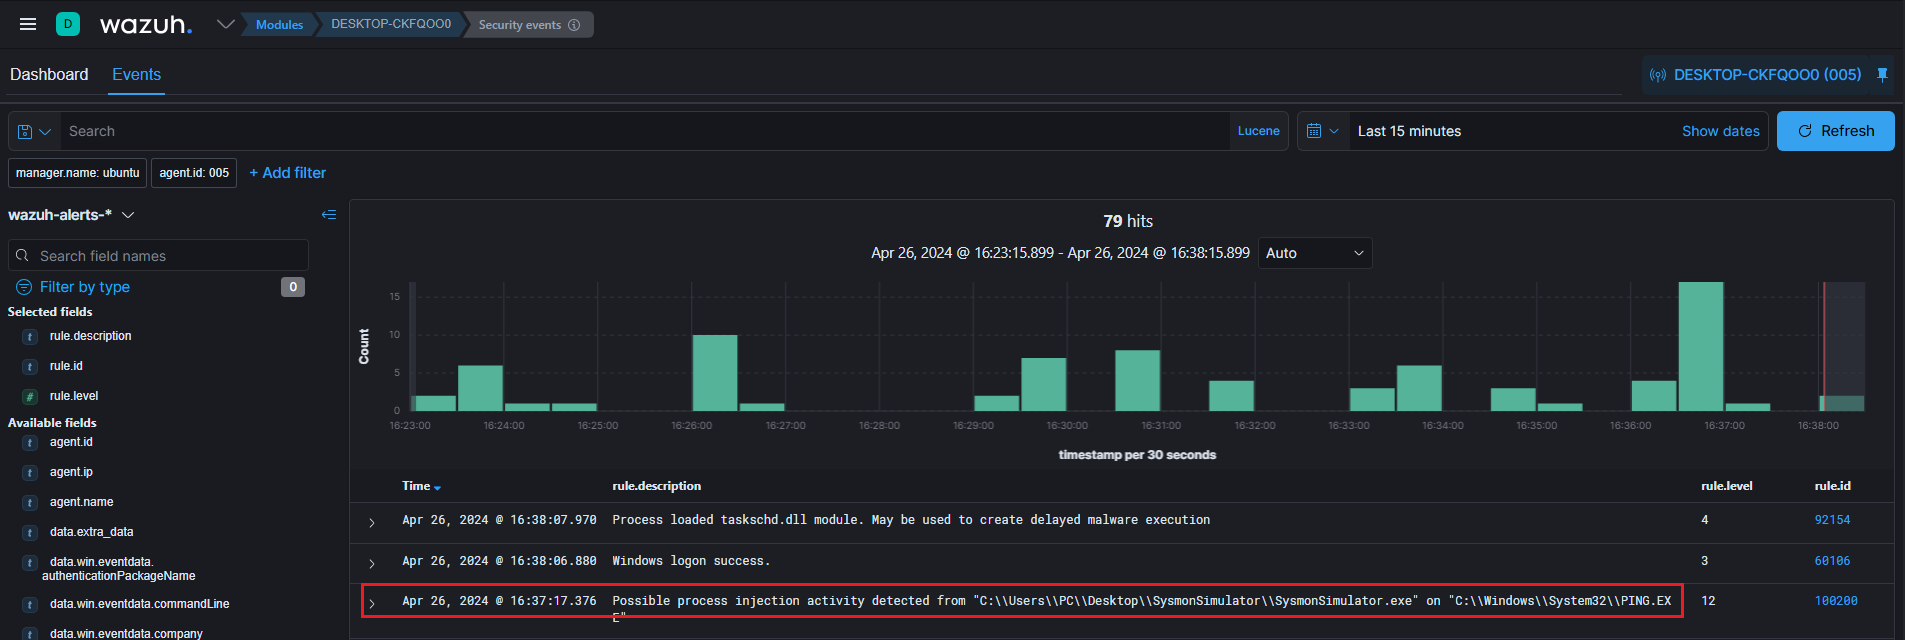
</group>Don’t forget to restart the Wazuh manager to apply the changes. Let’s test the rule and check if it’s working fine. Run SysmonSimulator, and you should see something similar to the image below.
6. Setting up all pieces together
After successfully detecting the CreateRemoteThread API call using Wazuh and Sysmon, let’s create an ElastAlert rule. This rule will send an alert to TheHive to notify us whenever there is an attempt of DLL injection. In practice, it’s impractical to monitor all the time through the Wazuh dashboard, as the number of alerts is significant. You can’t keep an eye on everything, so you’ll need to sort the alerts you receive and deal with the pertinent ones. If you don’t have ElastAlert installed already download it from here.The ElastAlert documentation provides comprehensive guidance on setting up and installing the tool. Once installed, navigate to the rules directory, create a new file, and name it what ever you want. Then, insert the following rule:
es_host: elastic_instance_ip
es_port: 9200
name: Wazuh Alert - DLL Injection Attempt
type: frequency
index: wazuh-alerts-*
num_events: 1
timeframe:
  minutes: 15
filter:
  - query_string:
      query: "(rule.mitre.id : T1055.001) AND (rule.mitre.technique: Dynamic-link*Library*Injection)"
realert:
  minutes: 0
alert: hivealerter
hive_connection:
  hive_host: http://thehive_instance_ip
  hive_port: 9000
  hive_apikey: thehive_api_key

hive_alert_config:
  title: "[Critical], [{0}] , [Possible process injection activity detected]"
  title_args: [agent.ip]
  type: "external"
  source: "wazuh"
  description: "{}"
  description_args: [rule.description]
  severity: 3
  customFields:
    - name: rule-name
      type: string
      value: data.win.eventdata.ruleName
    - name: source-ip
      type: string
      value: agent.ip
    - name: username
      type: string
      value: data.win.eventdata.sourceUser
    - name: source-process
      type: string
      value: data.win.eventdata.sourceImage
    - name: target-process
      type: string
      value: data.win.eventdata.targetImage
    - name: computer-name
      type: string
      value: data.win.system.computer
    - name: event-id
      type: string
      value: data.win.system.eventRecordID

tags:
    - "Process Injection"
    - "DLL injection"
The rule above queries events containing the attribute rule.mitre.id with the value T1055.001 and rule.mitre.technique with the value Dynamic-link Library Injection. When such an event is detected, ElastAlert triggers a notification to TheHive incident management platform.The table below contain details on the rule’s remaining elements:
| Element | Description |
|---|---|
| name | The name of your elastalert rule. |
| type | For further details about the different possible types, please refer here. |
| num_events | The number of events which will trigger an alert. |
| realert | This option allows you to ignore repeating alerts for a period of time. |
| alert | The Alerter type to use. In our case we want to send alerts to Thehive. |
| hive_connection | The connection details of your Thehive instance (IP,port,api_key). |
| hive_alert_config | Configuration options for customizing the alerts displayed in TheHive platform. |
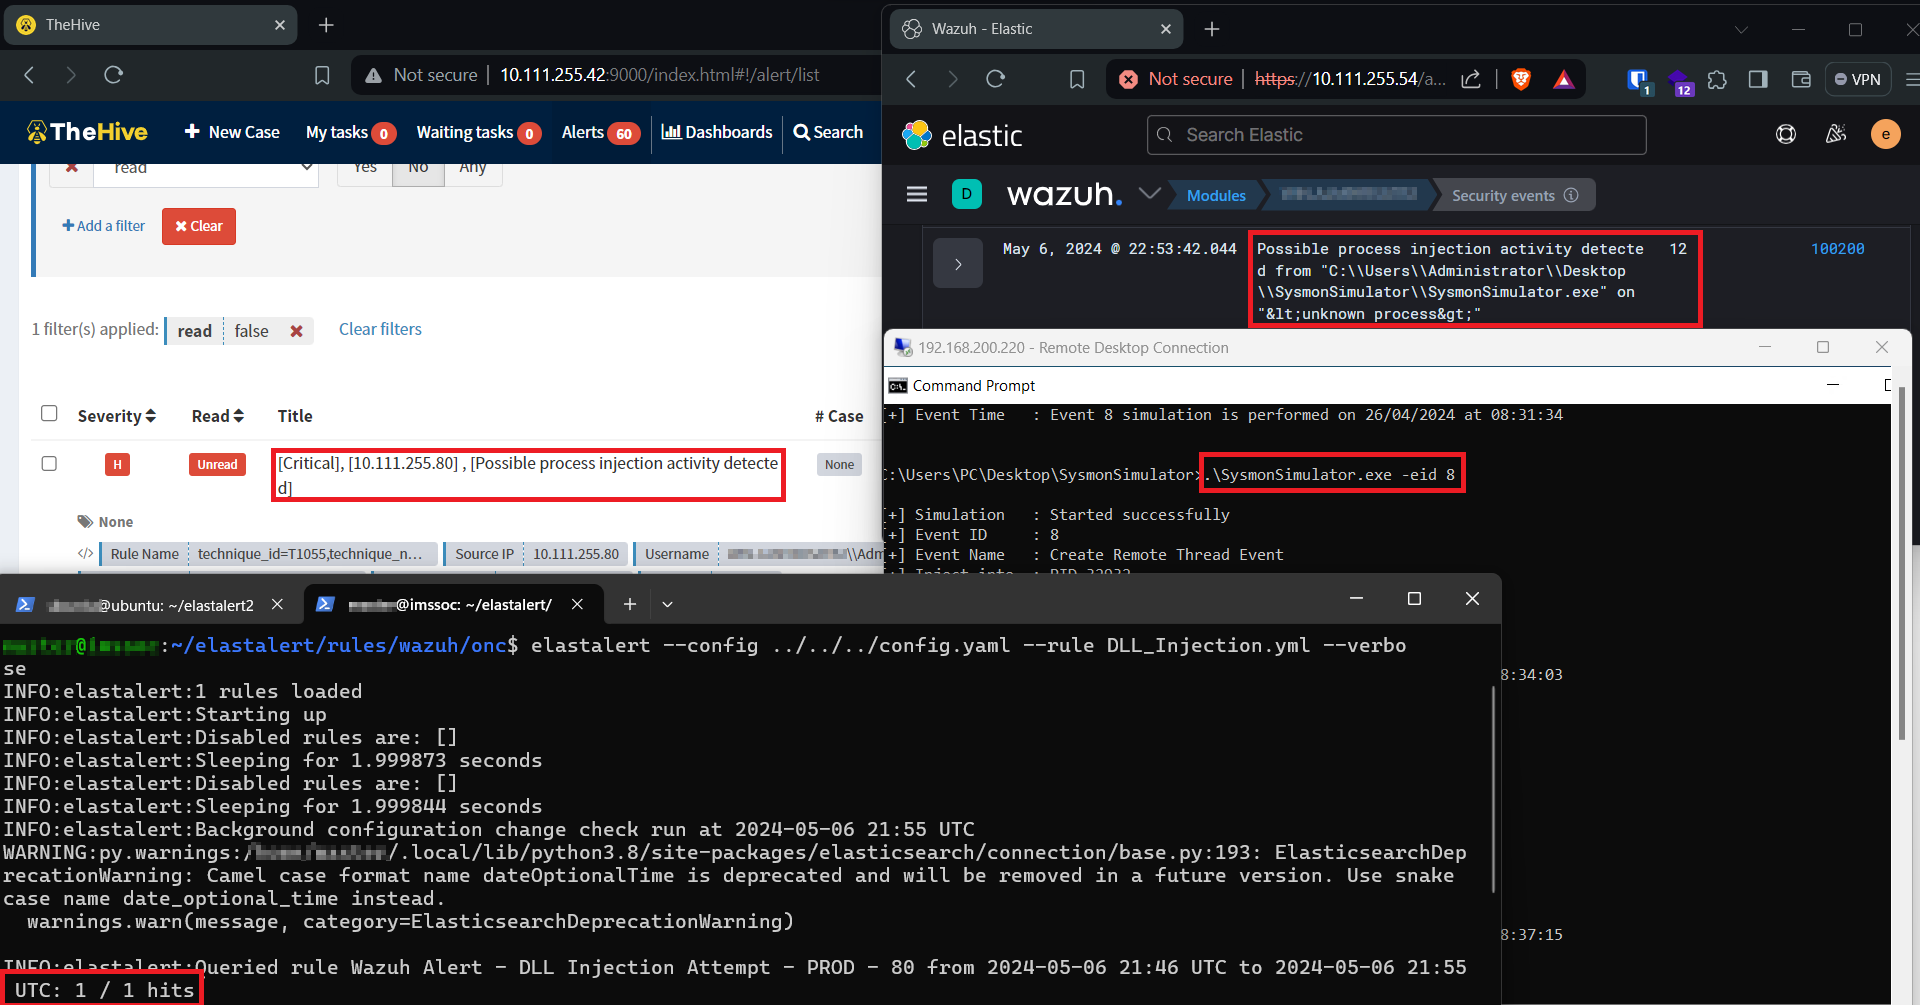
6. Test the rule
Now that everything is ready and set up, let’s test our rule to see if it’s working. For the test, I’ll be using the SysmonSimulator tool to trigger the CreateRemoteThread API. Afterward, we’ll run ElastAlert to detect the API call and send the results to TheHive. If everything is well set up you should promptly receive an alert notification within TheHive, as depicted in the accompanying screenshot.